Bountiful Bird Mobile
The little birds from this fabric panel make the sweetest stuffies. This rustic mobile is an easy way to group and display them.
Here's how:
You'll need the Bountiful Birds and Words fat quarter project panel, needle and thread, stuffing, and something to hang your birds on such as a dowel or stick.
1. Cut the fabric panel to separate the birds from the squares. Leave a quarter inch seam allowance along the left edge of the squares.

2. With a pencil, trace around one bird from each pair, leaving a quarter inch seam allowance.

3. Cut slowly along your pencil lines. It's easier to cut the bird panel into smaller sections before cutting out each individual bird. For the birds that you didn't draw around, simply leave as much white space as possible when cutting around the bird.


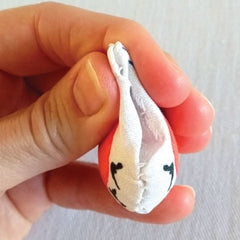
4. Each bird has a front and back piece. Place the fabric for each bird right sides facing. Hold up the fabric to a light source to make sure the outlines match up.
When you sew, Side 1 will be facing you, with Side 2 behind it. Make sure the fabric on Side 2 is aligned with, or extends beyond, the fabric on Side 1. This way, you're guaranteed to always be sewing through BOTH pieces of fabric as intended.


5. Prepare your needle. I used a hand quilting thread that's 32 percent cotton, 68 percent polyester. Double the thread and make 2 knots at the end.
6. Use a back stitch to attach the two pieces of fabric, leaving about a quarter inch seam allowance between your stitches and the bird print. The video below shows me sewing a back stitch.
Try to keep the border width consistent around the entire bird. Since you're sewing on the "wrong" side of the fabric, you can pencil in your intended path to help you maintain a consistent seam allowance. While I sewed, I held the 2 pieces of fabric together with my fingers and they didn't shift. If you want a more secure attachment, pin or baste the pieces before sewing.


7. If you need to start a new thread, tie off directly on the last stitch rather than in the fabric. This will ensure a clean edge when you stuff and close the bird.

8. Sew most of the way around the bird, leaving a 2" opening. Tie off your thread on the last stitch. The opening on my bluebird is a bit small; the size of my hummingbird opening is better.


9. Turn the bird right side out. Use a chopstick, pencil eraser, paintbrush handle, or other small, blunt point to gently push out the edges, curves, and corners.


10. Fill the bird with as much stuffing as you can so it's nice and plump.

11. Sewing the opening is the trickiest step. The cleanest approach is a ladder stitch (also called an invisible stitch or slip stitch). To prepare, tuck the fabric inside the bird. Sew back and forth along the length of the opening, placing your stitches about an eighth of an inch inside the opening. As you tighten your stitches, they'll disappear inside the folded edge.
If you're like me and you don't quite have the hang of the ladder stitch, go ahead and whip stitch the opening with tight stitches that fall about an eighth of an inch outside the opening. You can see in my photo of the lark that the stitches lay flat and look neat enough.

12. Once all the birds are sewn, it's time to assemble the mobile. I used a stick from my yard and attached the birds to it with doubled .005 transparent nylon quilting thread. You could use other items, like a rod or dowel, and try different colors of thread, embroidery thread, or string for attaching the birds.
Put your supplies on a flat surface and experiment with thread lengths and bird placement to find the arrangement that looks best before attaching everything.
Using a relatively long needle, knot the thread through a seam or small piece of fabric at the base of each bird, then push the needle through the bird vertically, emerging at the head. You may need to squish the bird a bit to get the needle through. Extend the thread to the desired length before attaching it to the stick. I placed the cardinal and robin on the same thread, and the pair of hummingbirds on the same thread.


If you haven't done anything with the squares from this project panel, check out the Bountiful Birds & Words Wall Hanging tutorial.